
Task 2
| |||||||
|
A. Find a useful definition of what a storyboard is,
and how it is used in film pre-production. Write your response below. For these tasks, you're going to improve your Storyboarding, and learn how to apply the language of FILM SHOT TYPES AND ANGLES to your storyboards. First, on your own, watch the clips about SHOT TYPES (and also about Angles and Camera Moves) at the links to the right: |
|
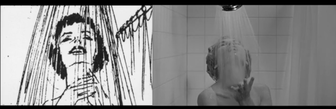
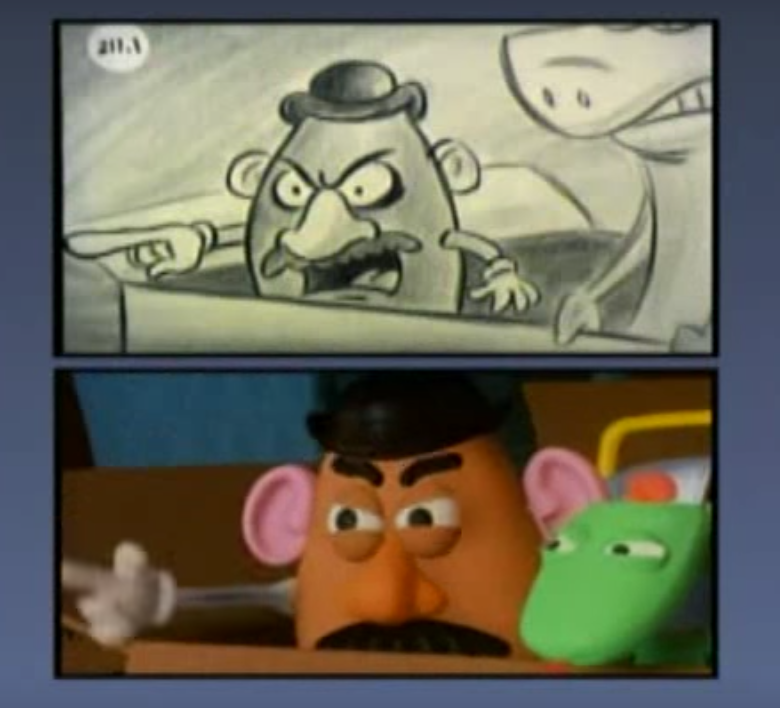
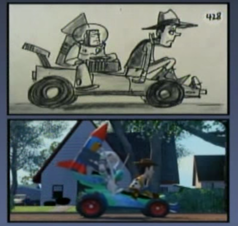
Also, see how Storyboards were used in the creation of the Pixar animation studio's TOY STORY (1995)
B. The task:
Now, watch ONE of the famous Hitchcock scenes again (in the links on the Knowing and Understanding page) and, on Storyboard paper, draw a sequence of SIX shots from the scene.
At the bottom of your storyboard frames, circle the appropriate information to support your
images. (Hint: you might watch the "How to Storyboard" link again to help you.)
Keep a hard copy of your Storyboard work in your folder, and insert a picture of it in your Weebly here.
"But I can't draw!"
Many beginning film students claim that they can't draw well enough to do Storyboards for
their films. The answer to that is, firstly, that IT DOESN'T MATTER! You only have to do basic drawings, just as long as they stay true to the space that will be filled up by objects in the frame
of a shot. See this link - Storyboarding for People who Can't Draw - for some reassurance:
their films. The answer to that is, firstly, that IT DOESN'T MATTER! You only have to do basic drawings, just as long as they stay true to the space that will be filled up by objects in the frame
of a shot. See this link - Storyboarding for People who Can't Draw - for some reassurance:
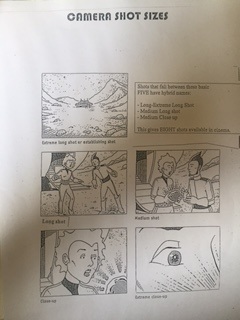
C. There are five standard shot sizes in cinema:
Extreme Long Shot (aka Establishing Shot)
Long Shot
Medium Shot (aka Mid-shot)
Close Up
Extreme Close Up
They are all outlined on the Camera Shot Sizes handout in your Media folder (over on the right, too).
There are also TWO variations:
Medium Long Shot – from the knees to the top of the head
Medium Close Up – from the chest to the top of the head
Draw one each of these on a Storyboard sheet, take a photo of it, and put it in your Weebly here.
D. PRE-PRODUCTION skill task: Short, suspenseful narrative
Plan a short film narrative to be told in exactly 10 shots.
You must:
First: Hand draw it as a storyboard, labelled with correct shot sizes.
Second: Shoot it in still shots only, and produce it as a still shot storyboard. To do this, use the Preshil Storyboard Master PDF (below). Download it, right click it and open with Photoshop.
Plan a short film narrative to be told in exactly 10 shots.
You must:
- Use the SEVEN shot sizes.
- Use them in the order you consider best to tell your still narrative, but all 7 shots must be used once only, initially.
- Take THREE more shots (any type you like) to complete the story.
- It must be suspenseful.
- If it was to be shot as a film, it must be an example of Pure Cinema style.
- It can involve a maximum of three actors.
- Note: this is a STILL PHOTO STORYBOARD task. You'll take the 10 shots as photos either on your phone, or a school camera, then make a storyboard out of them. (Later, you'll shoot them as a film.)
First: Hand draw it as a storyboard, labelled with correct shot sizes.
Second: Shoot it in still shots only, and produce it as a still shot storyboard. To do this, use the Preshil Storyboard Master PDF (below). Download it, right click it and open with Photoshop.
|
This is the Storyboard file that you need to complete your digital storyboard. If you need a refresher on how to use the Digital Storyboard, watch the video below.
| ||

|
|
E. - Shooting your Short Suspense Film
In groups of 3-4, students will:
|
